I&VN - EXERCISES

27/08/18- 26/10/18 (Week 1 - Week 9)
Maisara Arissa Azahari (0332707)
Illustration & Visual Narrative
Exercises
Exercises
INSTRUCTIONS
WEEK ONE - WEEK THREE
Can be found in I&VN - Project 1.
WEEK FOUR
21.09.18
Different Techniques of Drawing in Adobe Illustrator
For this week, Mr Kannan showed us different techniques of drawing in Adobe Illustrator and how to add texture for vectors.
The many ways of drawing in Adobe Illustrator includes,
- Paintbrush Tool (B)
- Direct selection Tool (A)
- Blob brush Tool (Shift+B)
Paintbrush Tool (B)
We can use it to write or draw anything free handed. We can even create our own brush.
To create our own brush style, there are few steps to do:
- Go to Windows - Brushes - New brush
- Choose calligraphy pen
- Name your brush
- Adjust size, angle, roundness
- Click OK
Blob Brush Tool (Shift+B)
Using this tool, colours can be added easily to what we created, either it being a vector or an illustration.
Steps of doing it:
- Use Blob Brush Tool draw a shape/character
- Choose colour from Colour/Swatches panel
- Trace the outline of shape/character created (Don't leave gaps)
- Click Direction Selection Tool (A) - click inner point handles to delete
- Repeat doing the same step till it is fully coloured

Fig 1.0 Blob brush practice
We also learned about placing textures to make our vectors or illustrations have more depth. This technique can be applied to create stickers, keychains, logos, poster, etc.

Fig 1.1 Texture placed onto hexagonal shapes
WEEK FIVE
28.09.18
Chiaroscuro
For this week, we learned about the Chiaroscuro technique. First thing that we were told to do was search up "Chiaroscuro pear: to find this specific photo to be used as reference for the exercise we were going to do for this week.
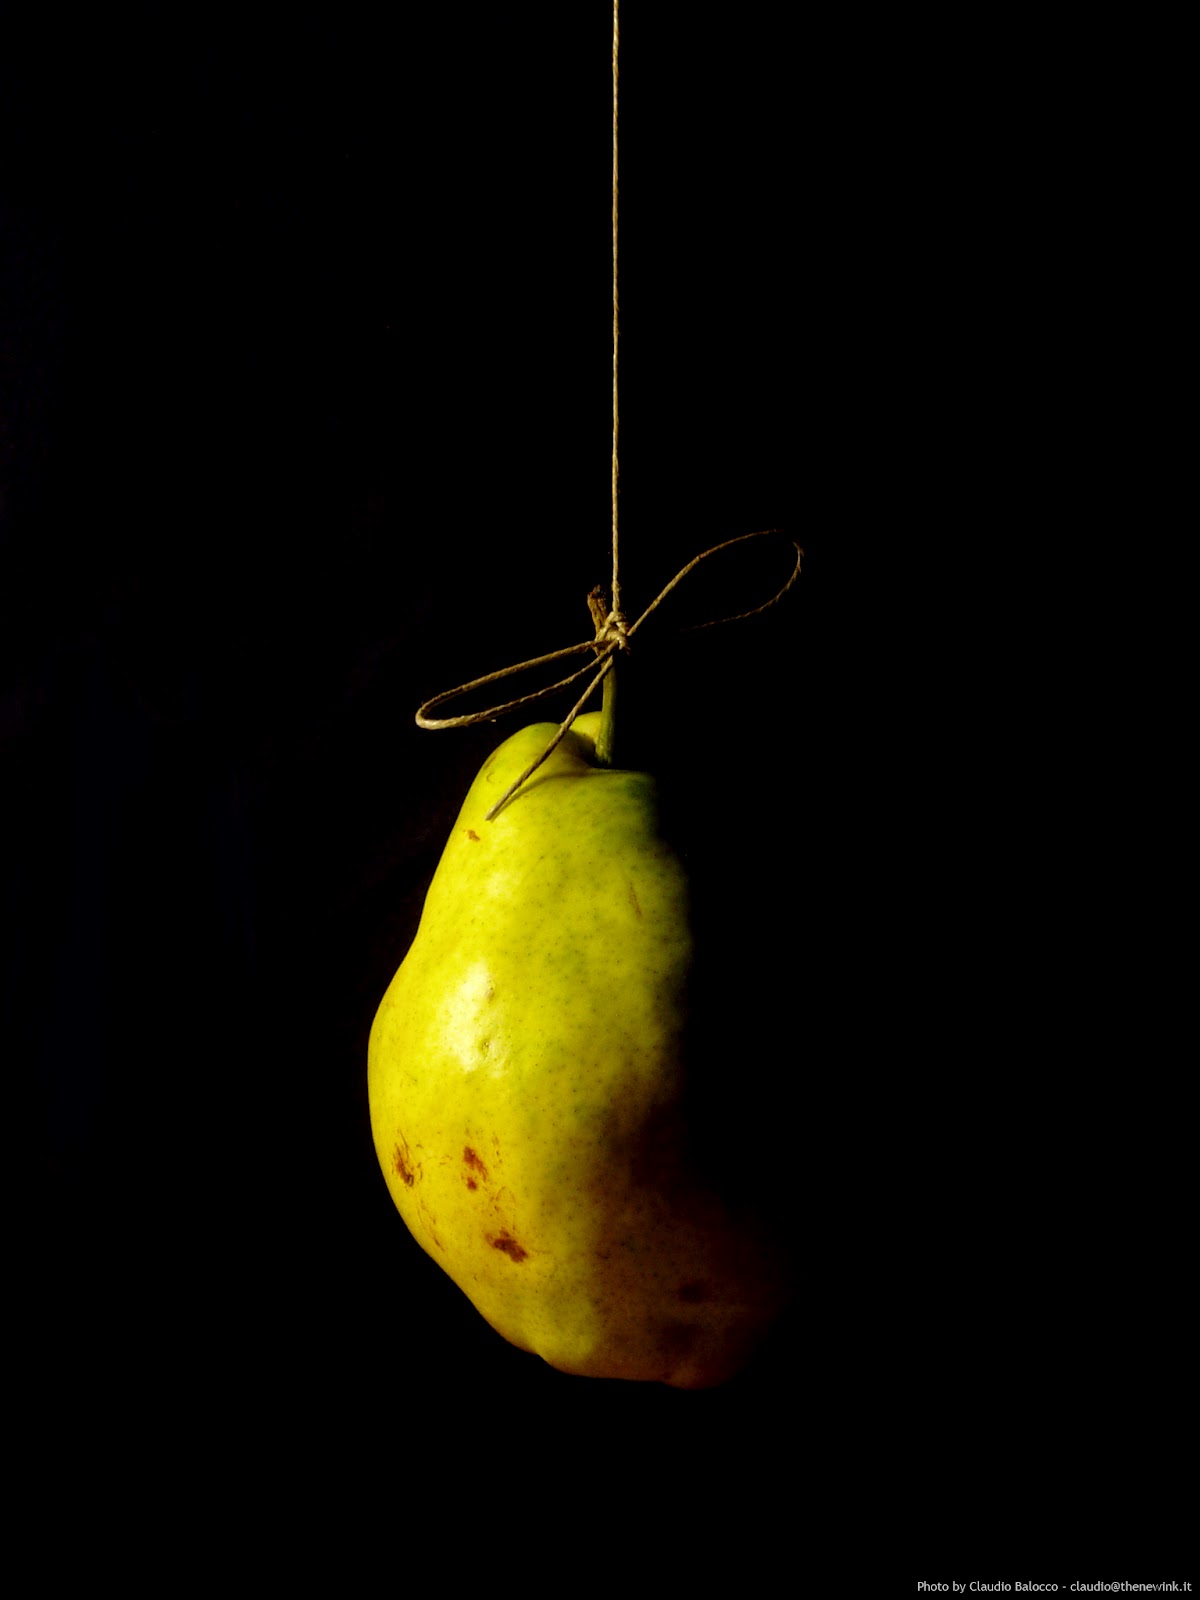
Fig 1.2 The Chiaroscuro Pear
For this Chiaroscuro technique, before we jumped into making an illustration showing light and shadow of the picture shown above, we were briefed on how to do it.
The Chiaroscuro techniques include,
- Open the image in AI
- Trace outline of the thing we want by using Pen tool
- Reflect the traced outline (O)
- Hold Option key, click and drag outline
- Merge outlines together by using pathfinder
- Reduce opacity of it
- Create new layer again
- Trace shadows by using Pen/Knife tool
- Merge them again
- Cut the pattern of the thing we want using Knife tool
- Choose colour that complement the thing we want
- Leave gaps in between each
- Draw any shape of each parts to give it depth

Fig 1.3 Overall look of the Chiaroscuro pear

Fig 1.4 Alternate look for the pear

Fig 1.5 Alternate look for the pear
After that, we were told to practice both the techniques on another reference photo that was given to us in Google Classroom.

Fig 1.6 The Chiaroscuro Person

Fig 1.6 Overall look for Chiaroscuro person

Fig 1.7 Overall look for Chiaroscuro with texture
WEEK SIX
1.10.18
Transitions
For this week, we learned about the types of panel-to-panel transitions. The transitions are a reference to Scott McCloud's Understanding Comics given by Mr Hafiz in Google Classroom.
Fig 1.8 Moment-to-moment, action-to-action, subject-to-subject transitions
Fig 1.9 Scene-to-scene, Aspect-to-aspect, Non-sequitor transitions
WEEK SEVEN
08.10.18
Identifying Transitions
For this week, we were told to identify the transitions used in the comic that was given through Google Classroom.
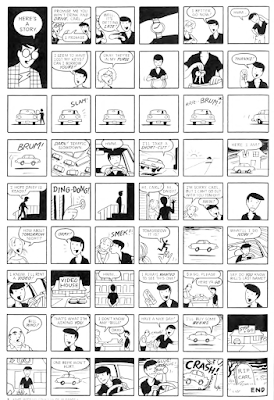
Fig 2.0 Comic given
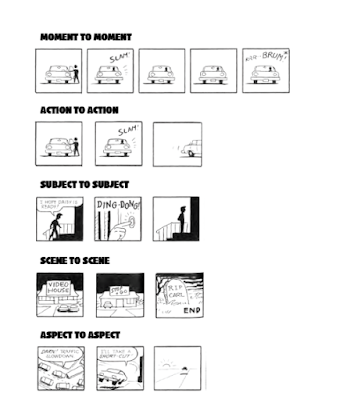
Fig 2.1 Transitions that I figured out
WEEK EIGHT
19.10.18
Shading Circle
For this week, we were taught how to paint highlights using the brush tool, how to use the eclipse tool, and how to use the paint bucket tool to colour in a selected shape.

Figure 2.2 Screenshot of layers used

Figure 2.3 Final outcome

Figure 2.4 Final outcome with background
WEEK NINE
26.10.18
Since most of my classmates were told to get a graphic tablet by Mr Kannan, it made it easier for them to use it for upcoming assignments and projects. It was used to create pen pressure related strokes, either horizontal, vertical or diagonal. Although weird at first, eventually we all got used to the graphic pen tablet.

Figure 2.5 Compilation of testing strokes using graphic pen tablet
Comments
Post a Comment